Make the LC Technology / LCSoft VS1053B Board work in MP3 mode

A few weeks ago I made the mistake of buying the MP3 player board manufactured by LC Technology (I have also seen them labeled as LCSoft). It was a mistake, because it took me days to get it to work and I did not realize it doesn’t have a SD reader.

That problem with the board is, that it starts in MIDI mode by default (which seems to be a flaw in the boards design). Therefore if you try to play MP3 files, you will only get noise, but your music. There are quite a few google results recommending soldering on the chip to get it into MP3 mode – Something I wasn’t keen on doing. Fortunately I found this post: http://www.bajdi.com/lcsoft-vs1053-mp3-module/#comment-33773

Since I am using the Adafruit_VS1053 library, I adapted it to its API:


Adafruit_VS1053_FilePlayer musicPlayer =
Adafruit_VS1053_FilePlayer(BREAKOUT_RESET, BREAKOUT_CS, BREAKOUT_DCS, DREQ, SD_CS_PIN);
musicPlayer.sciWrite(VS1053_REG_WRAMADDR, VS1053_GPIO_DDR);
musicPlayer.sciWrite(VS1053_REG_WRAM, 0x0003);
musicPlayer.GPIO_digitalWrite(0x0000);
musicPlayer.softReset();

Serial.print(F(„SampleRate „));
Serial.println(musicPlayer.sciRead(VS1053_REG_AUDATA));

With this it works perfectly for me (Output should be „SampleRate 8000“).

Warning! Do not use the sineTest function from the library with this. It does a hard reset of the chip and brings it back up in MIDI mode!

Arduino ESP8266 WiFi Shield (elecshop.ml) by WangTongze Comparison

After I dug more into the ESP8266 WiFi shield, I got curios, why the experiences were so different between various users.

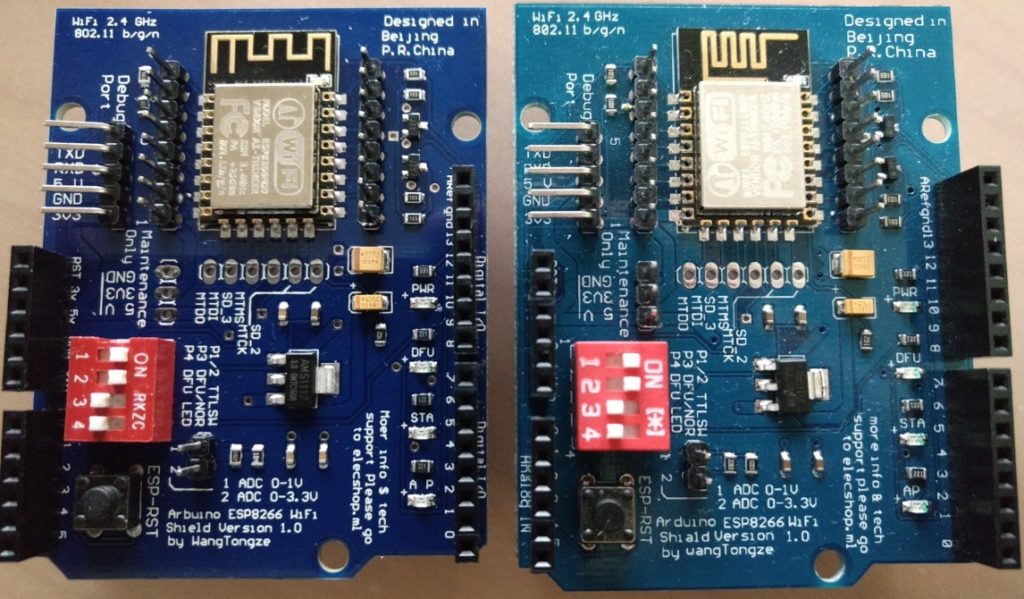
I took a look around in at aliexpress and decided to order another shield. Here is what I got now:

The one on the left is the new „shield“, the one on the right is my well known „shiald“. Apart from a few visible differences (color, maintenance pin header, different ESP8266 version), these are the differences I found so far in their functionality:

Scenario Shield Shiald
Wires to the debug port, switches off works as expected works as expected
Wires to the debug port, switches 1+2 on doesn’t work(?) works as expected
Wires to the debug port, switches 3+4 on ESP can be flashed ESP can be flashed
Shield mounted on Arduino Uno, switches off no connection between shield and Arduino. Serial Monitor/Flashing the Arduino does NOT work anymore no connection between shield and Arduino. both work independently
Shield mounted on Arduino Uno, switches 1+2 on no connection between shield and Arduino. Serial Monitor/flashing the Arduino does NOT work anymore shield is connected to the Arduinos hardware serial. Communication works fine
ESP-Link flashed onto the ESP8266 web interface is fast and stable. WiFi connection works fine web interface is very slow/unavailable sometimes. Connection to WiFi networks is doesn’t work sometimes

All in all, I’d highly recommend NOT to buy any of those shields. Their design seems to be flawed. If you still want to buy it anyway, I’d recommend the „shield“ variant. Even if it behaves more stupid than the „shiald“, it seems to provide more stable WiFi. Just bend pins 0 and 1 when attaching it to the Arduino and do the wiring manually as described in my other article.
In case your project is flexible enough and you need WiFi: Just use the something like a NodeMCU instead of the Arduino. You can still program it using the Arudino IDE, but it has the WiFi build in and way cheaper than the shield (or even the Arduino).

I have also seen a Version 0.9 of this shield in some shops, but I am not willing to invest more time and money in crappy hardware for scientific reasons 😉 . If someone has some experience with it, I’d be happy to read about it in the comments.

Using ESP8266 Shield ESP-12E (elecshop.ml) by WangTongze with an Arduino Uno

The Problem

Recently I became quite addicted to my new Arduino Uno. To maximize the fun, I ordered a variety of shields. Today I received my ESP8266 Shield ESP-12E, which turned out to be quite a hassle.

I ordered this:

an received this:

But apart from this the „Shiald“ seemed to be fine, but the problem was: There was absolutely no documentation available and searching for tutorials revealed a lot of people having problems, but most of them being unresolved and no consistent tutorial. Combining the information they gathered (and adding some trial & error), I was able to get my shield working.

Disclaimer: All this comes without any warranty. Although I got it working now, I think I damaged the RX/TX pins on my shield in the process!

Preparing the shield

By default the shields UART is set to 115200 baud. Since the Arduino Uno doesn’t have a hardware serial (except the one for the USB connection), we have to use a software serial connection, that cannot handle this speed. Therefore we have to set the ESP8266 to 9600 baud, which can be done sending the following command through the serial connection (NOTE: this will survive reboots, so we have to do this only once):

AT+UART_DEF=9600,8,1,0,0

Problem is: We need a serial connection to get the serial connection working! If you have the equipment, you can connect the „Debug Port“ directly to your computer and use this serial port. Since I don’t own the necessary cable, I had to do it differently. I detached the shield from the Uno and did some manual wiring:

Debug Port TX => Uno Pin 1 (TX)
Debug Port RX => Uno Pin 0 (RX)
Debug Port 5V => Uno 5V
Debug Port GND => Uno GND

Warning the Esp8266 is running on 3.3V, while the Uno uses 5V. I’m not sure this is handled on the debug port, so a direct connection (without level conversion) might damage your WiFi shield! Do so at your own risk!
(Note: No need to do anything to the 3.3V Port). The shields COM Port is now connected the same one the Uno is using for USB communication. To make sure they are not interfering, additionally we have to connect the Unos Reset pin to the Unos GND. Also make sure to set all 4 dip switches on the shield to off (down).

If you open the serial monitor now, set it to 115200 baud and reset the shield, you should see some gibberish follow by „ready“.  Once you select „Both NL & CL“ in the lower right corner of the serial monitor, you should be able to send the send the AT command to switch the baud rate (result should be „OK“). Once you do another shield reset, you should see gibberish only, until you switch the serial monitor to 9600 baud.

The same hardware setup can also used to flash new firmware to the ESP8266, if you set the switches 3 and 4 to „ON“ (disconnect power before doing so!). You can follow the instruction at http://www.instructables.com/id/Intro-Esp-8266-firmware-update/?ALLSTEPS then, using the COM port you usually use to flash your Arduino. Firmware can be found at https://github.com/sleemanj/ESP8266_Simple/tree/master/firmwarehttp://bbs.espressif.com/viewforum.php?f=61 or various other sides. For use with the Arduino, the Firmware doesn’t seem to matter to much, since ESP8266 is controlled via AT commands, which seem to be part of most of the available firmwares. (Note: You might need to set the baud rate again after updating the firmware).

In theory (I haven’t tested it yet) you should also be able to install your own sketches directly on the shield (instead of the uno), using this board configuration.

Making it work

Once the firmware is up to date and the baud rate is set, we are good to go: Make sure the dip switches are off again, remove the all the wiring and reattach the shield to the uno.

Since the shield uses PIN 0 and 1 by default, which sucks, because those are the Unos RX/TX pins, we have to wire them to new pins of our choice. E.g.:

Debug Port RX => Uno pin 2
Debug Port TX => Uno pin 3

Now you are able to use the WiFiEsp library to talk to your shield. Just make sure to use the correct pins for the software serial port

SoftwareSerial Serial1(3, 2)

and use the correct baud rate

Serial1.begin(9600);

Enjoy your wireless Arduino!

Die Drive-Now API und was macht der Ford Transit da eigentlich?

Im Gegensatz zu car2go bietet drive-now momentan leider (und unverständlicherweise) keine offene API für seine Fahrzeugdaten an. Nach meinem ersten Wurf für eine car2go Java Library wollte ich mich davon aber nicht stoppen lassen und habe mir einmal genauer angesehen, woher denn die Webseite ihre Daten bezieht. Erfreulicherweise findet sich dort recht schöne JSON-API, so dass dem Datenabruf (für mich war ohnehin nur der lesende Zugriff interessant) kein Problem zu sein schien.

Die Städte-Liste lädt die Webseite z.b. über https://api2.drive-now.com/cities?expand=cities – Doch ein GET auf diesen URI bringt erstmal Ernüchterung:

{"code":403,"message":"Permission denied."}

Doch nach etwas scharfem Hinsehen wird schnell klar was die Website anders macht. Das Javascript dort sendet zusätzlich einen „X-Api-Key“-Header im Request. Schickt man diesen mit, dann sieht das Ergebnis schon anders aus:

{
 "count": 8,
 "items": [
 {
 "businessAreaUrl": "https:\/\/api2.drive-now.com\/geodata\/6099\/6099.kml",
 "callCenterPhoneNumber": "+49 \/ 800 \/ 7234070",
 "carTypes": {
 "count": 0,
 "items": []
 },
 "cars": {
 "count": 0,
 "items": []
 },
 "chargingStations": {
 "count": 0,
 "items": []
 },
 "cityImageBaseUrl": "https:\/\/prod.drive-now-content.com\/fileadmin\/user_upload_global\/assets\/city\/{city}\/{color}\/{density}\/city.png",
 "countryLabel": "Germany",
 "fuelTypes": {
 "count": 0,
 "items": []
 },
 "id": "6099",
 "isoCountryCode": "DE",
 "latitude": 52.506629,
 "longitude": 13.381492,
 "mobileBusinessAreaUrl": "https:\/\/api2.drive-now.com\/geodata\/6099\/6099_mobile.kml",
 "name": "Berlin",
 "parkingSpaces": {
 "count": 0,
 "items": []
 },
 "petrolStations": {
 "count": 0,
 "items": []
 },
 "prolongAvailable": true,
 "registrationStations": {
 "count": 0,
 "items": []
 },
 "routingCityName": "berlin",
 "routingCountryName": "germany",
 "showBusinessAreaByDefault": false,
 "showChargingStationVisible": true,
 "showPetrolStationVisible": true,
 "showRegistrationStationVisible": true,
 "transmissionTypes": {
 "count": 0,
 "items": []
 }
 },
...
}

Die Struktur sieht auf den ersten Blick etwas merkwürdig aus, aber auf jeden Fall erhält man Infos über alle aktiven Städte. Die Attribute sind dabei recht selbsterklärend, so dass nicht im Detail darauf eingehen werde. Lediglich die numerische „id“ (= CityId) ist von hervorgehobener Bedeutung, die wird später nämlich noch benötigt. Auffällig sind auch die diversen leeren Arrays „mit“ fehlenden Infos: „carTypes“, „cars“, „fuelTypes“, „parkingSpaces“, …

Also die URL nochmal genauer betrachtet und am „expand=cities“ hängen geblieben. Was wenn ich „carTypes“ sehen möchte?

https://api2.drive-now.com/cities?expand=carTypes liefert die Antwort:

{
 "count": 8,
 "items": [
 {
 "businessAreaUrl": "https:\/\/dev.service.drive-now.com\/geodata\/6099\/6099.kml",
 "callCenterPhoneNumber": "+49 \/ 800 \/ 7234070",
 "carTypes": {
 "count": 6,
 "items": [
 {
 "carImageUrl": "https:\/\/de.drive-now.com\/static\/drivenow\/img\/cars\/mini.png",
 "group": "MINI",
 "make": "BMW",
 "modelIdentifier": "mini",
 "modelName": "MINI",
 "series": "MINI",
 "variant": ""
 },
 {
 "carImageUrl": "https:\/\/de.drive-now.com\/static\/drivenow\/img\/cars\/mini_clubman.png",
 "group": "MINI",
 "make": "BMW",
 "modelIdentifier": "mini_clubman",
 "modelName": "MINI Clubman",
 "series": "MINI",
 "variant": "Clubman"
 },
 {
 "carImageUrl": "https:\/\/de.drive-now.com\/static\/drivenow\/img\/cars\/mini_countryman.png",
 "group": "MINI",
 "make": "BMW",
 "modelIdentifier": "mini_countryman",
 "modelName": "MINI Countryman",
 "series": "MINI",
 "variant": "Countryman"
 },
 {
 "carImageUrl": "https:\/\/de.drive-now.com\/static\/drivenow\/img\/cars\/bmw_1er.png",
 "group": "BMW",
 "make": "BMW",
 "modelIdentifier": "bmw_1er",
 "modelName": "BMW 1er",
 "series": "1er",
 "variant": ""
 },
 {
 "carImageUrl": "https:\/\/de.drive-now.com\/static\/drivenow\/img\/cars\/bmw_activee.png",
 "group": "BMW",
 "make": "BMW",
 "modelIdentifier": "bmw_activee",
 "modelName": "BMW ActiveE",
 "series": "ActiveE",
 "variant": ""
 },
 {
 "carImageUrl": "https:\/\/de.drive-now.com\/static\/drivenow\/img\/cars\/bmw_active_e.png",
 "group": "BMW",
 "make": "BMW",
 "modelIdentifier": "bmw_active_e",
 "modelName": "BMW ACTIVE E",
 "series": "ACTIVE E",
 "variant": ""
 }
 ]
 },
 "cars": {
 "count": 0,
 "items": []
 },
 "chargingStations": {
 "count": 0,
 "items": []
 },
...

Siehe da: Fahrzeugtypen! Und auch für die anderen Arrays funktioniert das wunderbar. Auch ein „expand=full“ ist verfügbar und liefert die Inhalte aller Arrays, wobei die Ladezeiten hier vermuten lassen, dass man sich damit bei den Sys-Admins von Drive-Now keine Freunde macht.

Etwas fokussierter wird das ganze aber mit folgender URI: https://api2.drive-now.com/cities/4604?expand=full Das Ergebnis sind alle Daten für die CityId 4604 (München). Auch die anderen expand-Werte funktionieren hier wieder.

Aber es geht noch spezifischer: https://api2.drive-now.com/cities/4604/cars liefert ausschließlich die Autos für München, ohne die City Informationen als Wrapper-Objekt.

Im Ergebnis des „expand=cities“-Aufrufes kann man außerdem sehen, dass unter https://api2.drive-now.com/geodata/4604/4604.kml bzw. https://api2.drive-now.com/geodata/4604/4604_mobile.kml ein KML des jeweiligen Geschäftsgebietes zu finden ist (wobei ich noch keine Muse hatte den Unterschied der _mobile Version näher zu betrachten. Infos dazu gerne in die Kommentare). Im Gegensatz zu den anderen URIs, ist für die KMLs kein API-Key notwendig.

Wirklich erheiternd wird das ganze allerdings, wenn man sich das Javascript der Webseite etwas genauer ansieht, weil man z.B. auf der Suche nach einem funktionierenden API-Key zum testen ist. Dort finden sich nämlich solche Schmankerl (URLs leicht verfremdet):

 getNApiUrl: function() {
 return this.napiUrl = "entw" === this.getEnv() || "dev" === this.getEnv() ? "https://xxx.service.drive-now.com/" : "stage" === this.getEnv() ? "https://other-xxx.service.drive-now.com/" : "https://api2.drive-now.com/", this.napiUrl

Nicht weiter schlimm, schließlich fehlt der API-Key? Nunja:

 return r.getEnv() === "entw" || r.getEnv() === "dev" ? t = "ichBinDerDevAPIKey" : r.getEnv() === "stage" ? t = "ichBinDerStageAPIKey" : t = "ichBinDerDevAPIKey", $("html").hasClass("phmode") ? $.extend(e, {

Aber Entwicklungssystem sind doch bestimmt nicht von extern erreichbar! Nunja²:

{
 "businessAreaUrl": "https:\/\/dev.service.drive-now.com\/geodata\/1774\/1774.kml",
 "callCenterPhoneNumber": "+49 \/ 800 \/ 7234070",
 "carTypes": {
 "count": 4,
 "items": [
 {
 "carImageUrl": "https:\/\/de.drive-now.com\/static\/drivenow\/img\/cars\/mini.png",
 "group": "MINI",
 "make": "BMW",
 "modelIdentifier": "mini",
 "modelName": "MINI",
 "series": "MINI",
 "variant": ""
 },
 {
 "carImageUrl": "https:\/\/de.drive-now.com\/static\/drivenow\/img\/cars\/bmw_1er.png",
 "group": "BMW",
 "make": "BMW",
 "modelIdentifier": "bmw_1er",
 "modelName": "BMW 1er",
 "series": "1er",
 "variant": ""
 },
 {
 "carImageUrl": "https:\/\/de.drive-now.com\/static\/drivenow\/img\/cars\/for_transit_100_d.png",
 "group": "FOR",
 "make": "FOR",
 "modelIdentifier": "for_transit_100_d",
 "modelName": "FOR TRANSIT 100 D",
 "series": "TRANSIT 100",
 "variant": "D"
 },
 {
 "carImageUrl": "https:\/\/de.drive-now.com\/static\/drivenow\/img\/cars\/for_transit_80_d.png",
 "group": "FOR",
 "make": "FOR",
 "modelIdentifier": "for_transit_80_d",
 "modelName": "FOR TRANSIT 80 D",
 "series": "TRANSIT 80",
 "variant": "D"
...

Doch, ist es! Und es ist spannend, denn die letzten beiden Fahrzeugtypen kommen doch eher überraschend. Ob das als Ankündigung zu verstehen ist oder die Entwickler eine merkwürdige Auswahl an Test-Daten getroffen haben bleibt aber natürlich offen.

Der Fairness halber habe ich Drive-Now vor > 2 Wochen auf ihr eigenes „Überangebot“ an APIs hingewiesen. Trotz Versprechen das an die Technik weiterzuleiten, ist (trotz zwischenzeitlichem Javascript-Code-Update auf der Seite) aber bisher alles weiterhin frei zugänglich.

Meine Anfrage nach einem eigenen API-Key wurde außerdem leider ohne weitere Begründung abgelehnt.
Client/Server Validierung

In den letzten Monaten und Jahren habe ich mich bei diversen Gelegenheiten mit RESTful APIs und der Entwicklung von Clients für selbige beschäftigt. Die Frameworks dafür sind zahllos und für jeden Geschmack ist schnell etwas passendes gefunden. Mit wenigen Zeilen Code steht ein einfacher Server und auch ein hübscher Client ist schnell gehackt. Die Konzepte dahinter sind genau so vielfältig, wie clever.

Einen Aspekt habe bisher aber noch nirgendwo zufriedenstellend gelöst gesehen: Validierung. Als Benutzer möchte man das Feedback möglichst früh und vollständig. Client-Validierung ist also ein muss. Andererseits traut der geneigte Entwickler niemals einem Client. Validierung auf dem Server ist also nicht nur ebenfalls ein muss – und sollte dann auch noch mit der Client-Validierung zusammen passen. Was passiert also momentan? Die Validierung wird doppelt (oder gar noch öfter, wenn man es mit mehreren Clients zu tun hat) und – damit es richtig Spaß macht – auch noch in verschiedenen Sprachen (wenn man nicht gerade auf dem Server auch mit Javascript arbeitet) implementiert. Bleibt die Frage: Warum?!

Die Lösung, die ich mir vorstelle, sieht ungefähr so aus (Beispielhaft für meinen Technologie Stack, aber sicher auch auf andere Technologien übertragbar):

Validierungsregeln auf Server-Seite über Bean Validation (Das funktioniert bereits wunderbar):

public class User implements Serializable {
 @NotEmpty
 @Email
 private String email;

 @Size(min=5)
 @Pattern(regexp = "[a-zA-Z]*")
 private String username;

 @Size(min=8)
 private String password;
}

Validierung dann durchgeführt durch den Spring MVC Controller. (Das „schema“-Attribut der @Controller Annotation ist Wunschdenken, der Rest funktioniert ebenfalls schon)

@Controller(schema=SchemaProvider.AUTO)
public class UserController {

 @RequestMapping(value = "/user", method = RequestMethod.POST)
 public String saveUser(@Valid User user, BindingResult bindingResult) {
  /* ... */
 }

}

Dank des „SchemaProvider.AUTO“ veröffentlicht der Controller die Meta(/Validierungs)-Daten unter /user?schema als JSON Schema. Eine Grundlage dafür liefert evtl. dieser Pull Request für das Jackson JSON Schema Module. Das Ergebnis sähe dann vielleicht so aus:

{
 "title": "User Schema",
 "type": "object",
 "properties": {
  "email": {
   "type": "string",
   "pattern": "[A-Z0-9._%+-]+@[A-Z0-9.-]+\.[A-Z]{2,4}"
  },
  "username": {
   "type": "string",
   "pattern": "[a-zA-Z]*",
   "minimum": 5
  },
  "password": {
   "type": "string",
   "minimum": 8
  }
 },
 "additionalProperties": false,
 "required": ["email", "username", "password"]
}

Das wiederum kann Angular Schema Form benutzen, um mit minimalem Code ein hübsches Formular zu zaubern und live zu validieren (siehe die Beispiele):

[
 "email",
 "username",
 "password",
 {
  "type": "submit",
  "style": "btn-info",
  "title": "OK"
 }
]

IMHO wäre das eine sehr elegante Lösung, die mit minimalem Code-Aufwand auskommt und die Validierungsregeln relativ einfach synchronisiert. Denkbar wäre z.B. auch die Regeln aus dem JSON Schema für die Validierung in Mobile Apps zu verwenden.

Nachteile? Man benötigt bereits bei der Anzeige des Formulars einen zusätzlichen Server-Aufruf, was in manchen Situationen schmerzen kann. Außerdem funktioniert das natürlich nur für ein Set an Standardvalidierungen. Will man z.B. sicherstellen, dass die E-Mail-Adresse auch unique ist, dann wird die Sache schon etwas komplizierter – Aber nicht unlösbar!

Mein neues Bastelprojekt für die Winterzeit ist jedenfalls gefunden – Ich will das haben!